Sunday, December 21, 2014

Chinese Rice Soup (Jook)

Oh the wonders of hindsight! This was my first Thanksgiving away from my family and Thanksgiving is not complete without some jook! I took the turkey bones from my fiance's family dinner and decided to make my first attempt!

Jook is Chinese porridge rice soup. In my family we serve it after dessert - around the time when lots of families are having some left over turkey sandwiches.

Once the turkey is served the bones are thrown into a pot withe some rice and cooked in that broth until thick. This is served with some green onions, crispy noodles, and some of the left over meat.

What I did:
Picked most of the meat off the turkey bones. Put the bones into the largest pot in the kitchen. Filled the pot with water until it was covered and then added in 3 cups of rice. This made a TON of soup. I ended having to take some out of that pot and starting a second pot. Once the rice was tended and mushy the soup was done. Carefully pick out all the bones and then we eat!

Next time:
I will make the broth first. Put bones in a large pot, cover with water, let simmer 30-40 minutes. Strain the broth with a sieve to catch all the bones, bone parts, and weird floating things. Pour the broth back into the pot and then add the rice to the broth (1 cup rice to 3 cups broth). Let it simmer until thick, approx 20-30 minutes. Then add the turkey meat and serve!

Update: The steps for "Next Time" worked great!

Saturday, December 20, 2014

Homemade Shake n' Bake Chicken

Need a dinner idea? This ended up being a crowd pleaser and I will make this again. I was going to purchase store brand Shake n' Bake or Oven Fry but both use High Fructose Corn Syrup. Since it was mostly breading I figured I would try and make it at home and I would also save some money!

I decided to use this recipe from The Black Peppercorn. I did make a few changes based on what was available in our house. I omitted the onion flakes, reduced the sugar to 1 tsp and reduced the black pepper to 1/2 tsp. Instead of a mix of parsley, basil, and oregano I used 2 tsp of Italian seasoning. I did use the 1/2 tsp cayenne but I would use 1/4 tsp or omit next time. It was ok, but the kids commented that there was a bit of spice (not that it stopped them from eating it).

Instead of shaking the chicken in a plastic bag I used a glass pie plate and dipped the chicken.

I used almost all of the seasoning on 6 flattened chicken breast so I estimate that the full amount of seasoning made below would coat 8 chicken breasts.

I served this with mashed potatoes and Oven Roasted Broccoli. I cooked the broccoli for about 15 minutes while the chicken was baking.

Homemade Shake n Bake Seasoning 
3 cups Panko bread crumbs
¼ cup vegetable oil
just under 1 tbsp salt
3 tsp paprika
1 tsp sugar
1 tsp garlic powder
½ tsp black pepper
¼ tsp cayenne pepper
2 tsp Italian seasoning

Mix all ingredients in a large bowl until evenly mixed and the bread crumbs are no longer 'clumpy' from the oil. Pour jar or plastic container and store in the freezer for 1-2 months.

Shake n Bake Chicken
  • Preheat oven to 400F. 
  • Pound chicken breast to about ¼- ½ inch thick. 
  • Rinse chicken in cold running water. Let excess water drain off.
  • Place chicken, one piece at a time, in the bag with a couple cups of the shake n bake.
  • Seal and shake the bag so that the chicken is totally coated in the breading.
  • Remove the chicken from the bag, shaking off excess breading.
  • Place on a cookie sheet lined with aluminum foil or on a silpat mat
  • Bake boneless chicken for 20-25 minutes.
Note: 3 cups makes a lot. If you are making 4 large chicken breast I would suggest halving the recipe or even using 1/3.

Tuesday, November 11, 2014

Dinner Rolls

These rolls are easy and can be prepped ahead of time. I followed this recipe from The Kitchn. I made these to go with The North Carolina Pulled Pork. While great as regular dinner rolls, these would work smaller for sliders or larger for burger buns. 

from the fridge overnight 
1 hour from the fridge
cooked!
with the pulled pork
Dinner Rolls
Makes 12 rolls

Ingredients
1 tablespoon active-dry yeast
1/2 cup warm water
1/2 cup milk (I used almond milk)
1 large egg
2 tablespoons vegetable oil
2 tablespoons sugar
1 teaspoon salt
3 cups all-purpose flour
1 tablespoon butter

Instructions
1. In a stand mixer: stir the yeast into the warm water and let it sit until dissolved.
2. In a separate bowl, whisk together the milk, egg, oil, sugar, and salt. Add this to the yeast mixture and stir until combined.
3. Add all the flour and stir until it forms a shaggy dough.
4. Knead the dough at low speed for 8-10 minutes, until smooth but slightly tacky. It should spring back when poked.
5. Cover the mixing bowl and let the dough rise in a warm spot until doubled in bulk, about an hour.
6. Dust your work surface with a little flour and turn the risen dough out on top. Divide the dough into 12 pieces. Roll the dough against the counter or between your palms until round.
7. Line a 9x13 pan with parchment and spray with nonstick coating. Arrange the rolls inside the pan spaced a little apart*.
8. Let the rolls rise until they fill the pan roughly 30-40 minutes. While the rolls are rising, pre-heat the oven to 375°F.
9. Brush the rolls with butter. Melt the butter and brush it over the risen dinner rolls. This helps the tops to brown and keeps the crust soft. (I forgot this step)
10. Bake the rolls until golden, 15-18 minutes.
11. Lift the rolls from the pan using the parchment and let the rolls cool on a wire rack until cool enough to handle.

*At this point you can also cover the rolls and put into the fridge to rise over night for dinner the next day. The next day let the rolls come to room temp (about 1 hour) prior to baking. Then continue with step 8.

Saturday, November 8, 2014

Homemade French Fries

"These taste like real french fries!!" The kids were pretty impressed that I was able to turn potatoes into french fries at home.

Super easy and a relatively healthy side dish. The silpat mat helps make the fries extra crispy.

Often these are served with Mr. Tom's Chicken and Oven Roasted Broccoli.


French Fries
1 potato = 1 to 2 people

Directions
Preheat oven to 400F. 
Peel raw potatoes. Slice them up. Thinner will cook faster.
Put sliced potatoes on silpat/foil/parchment lined cookie sheet.
Drizzle with olive oil and your choice of seasonings. I do a little garlic powder, salt, and pepper. Toss to coat all the potato pieces. If it was for adults I would add some cayanne or oregano.
Bake 25-45 minutes. The difference will be how thick the potatoes were cut and how crispy you want the fries. Fries are done when you pierce with a fork and the potato is tender.

Enjoy!


Saturday, October 11, 2014

Peanut Butter Cookies

Cookie time! I made this recipe with some homemade peanut butter. But other then that it is a very basic cookie dough and most people will have all the ingredients on hand.

I used a small cookie scoop so these cookies are all bite sized. I'm not sure why but I almost always make cookies that are small. But between the size and the sticky dough, the criss cross pattern was not meant to be. The recipe recommended rolling the cookies in granulated white sugar then doing the criss cross. If I did that, I would have reduced the white sugar in the cookies to 3/4 cup. But rolling the cookie in the sugar would have prevented the fork from sticking. Another thought that I think could have helped was if the cookies were larger and the fork was floured or buttered. 

Long story short, instead of making the fork prints - I gently pressed them flat with my fingers. That means I touched EVERY COOKIE! Touch it you take it, right?

Since I didn't want to wait 3 hours to chill the dough so I put it in the freezer for 30 minutes then popped it in the fridge for another 15 while I waited for the oven to free up. Yes, I would love to have double ovens in my kitchen!

What was interesting was the difference in the cookies with chilled batter vs not chilled batter. In this picture the top left is the 1st sheet from the fridge, top left is the 1st sheet without the criss-cross, bottom left is the 2nd round of cookies. Then I put the dough in the fridge between the 3rd and 4th cookie. Taste didn't change but the look certainly varied.

Regardless, these cookies didn't spread very much and I was able to fit 20 cookies on a regular sized cookie sheet.

The recipe said they would look kind of underdone when I take them off the sheet so I probably overcooked them, but we all thought they were great! I cooked them for 12 minutes.

The recipe below is adapted from Sally’s Baking Addiction. The site says that the cookies will store at room temperature for up to one week and that the baked cookies or dough will freeze for up to 3 months.

Peanut Butter Cookies
Makes 80 small cookies

1 cup unsalted butter, softened to room temperature
1 cup granulated sugar
3/4 cup light brown sugar
2 large eggs, room temperature preferred
2 tsp vanilla extract
1 cup creamy peanut butter
3 cups + 2 tbsp all-purpose flour
1 tsp baking soda
1 tsp baking powder
1/2 tsp salt

Using a stand mixer with paddle attachment, cream the butter and sugars until smooth. Add the egg and mix on high until combined, about 1 minute. Scrape down the sides and bottom of the bowl as needed. Add the vanilla and peanut butter and mix on high until combined. Set aside.

In a separate bowl, toss the flour, baking soda, baking powder, and salt together. Add the dry ingredients to the wet ingredients and mix on low until combined. Dough will be thick, yet very sticky. Cover dough tightly and chill for at least 3 hours in the refrigerator.

Preheat oven to 350F degrees. Line two large baking sheets with parchment paper or silicone baking mats.

Press fork into the tops to create the criss-cross pattern. Bake for 12 minutes or until very lightly browned on the sides. The centers will look very soft and undone. The cookies will continue to "set" on the baking sheet during this time.

Dutch Oven Bread

I know bread is intimidating but this bread really was easy. I adapted it from The Lean Green Bean. It was very sticky dough so when you do take it out to knead make sure that your hands are well coated in flour. I let the dough rise next to the slow cooker while it was cooking this beef stew.

Oh my. This bread was so crusty and soft and chewy and just so easy. I will be making this recipe again. Ideas for future loaves include adding garlic, oregano, thyme, or rosemary to the dough.

When dealing with yeast I heat the water on the stove with a thermometer until it reaches 111F. Then I take it off the stove and pour it into a glass Pyrex. I figure 111F will be good because it may continue to get warmer in the pot and if the water is too hot it will kill the yeast. I add the yeast then and let is sit. You’ll know when it starts to activate as it will get a gloopy and start to have a scent.

It took about 10 minutes to get the dough combined then another 20 minutes of work with kneading it twice. There is about 5 hours worth of down time for errands, house cleaning, sports, and reading. Again, not a huge amount of time invested in this bread.

This is cooked the dough in this enamel cast iron casserole pan that has a cover. 
Dutch Oven Bread
Makes 6 large slices

1½ c warm water (110F-115F)
2¾ tsp active dry yeast
1 tsp sugar
3 c all-purpose flour
1 tsp salt

Heat water to 110-115F. Add yeast and pinch of sugar, let sit for 5 minutes.
Add salt and flour and stir until a shaggy ball of dough is formed.
Cover and let rise in a warm place for 4 hours.
Turn dough out onto a floured surface. With well floured hands, knead the dough 5-10 times.
Return dough to the bowl and let rise for another 30 minutes.
While dough is rising, place your dutch oven (uncovered) in the oven and preheat to 430F.
After 30 minutes, use floured hands to reshape dough into a ball and carefully drop into the dutch oven.
Cover and let bake for 30 minutes.
Uncover and let bake 10-15 minutes longer.
Remove loaf from dutch oven and let cool.

Beef Stew

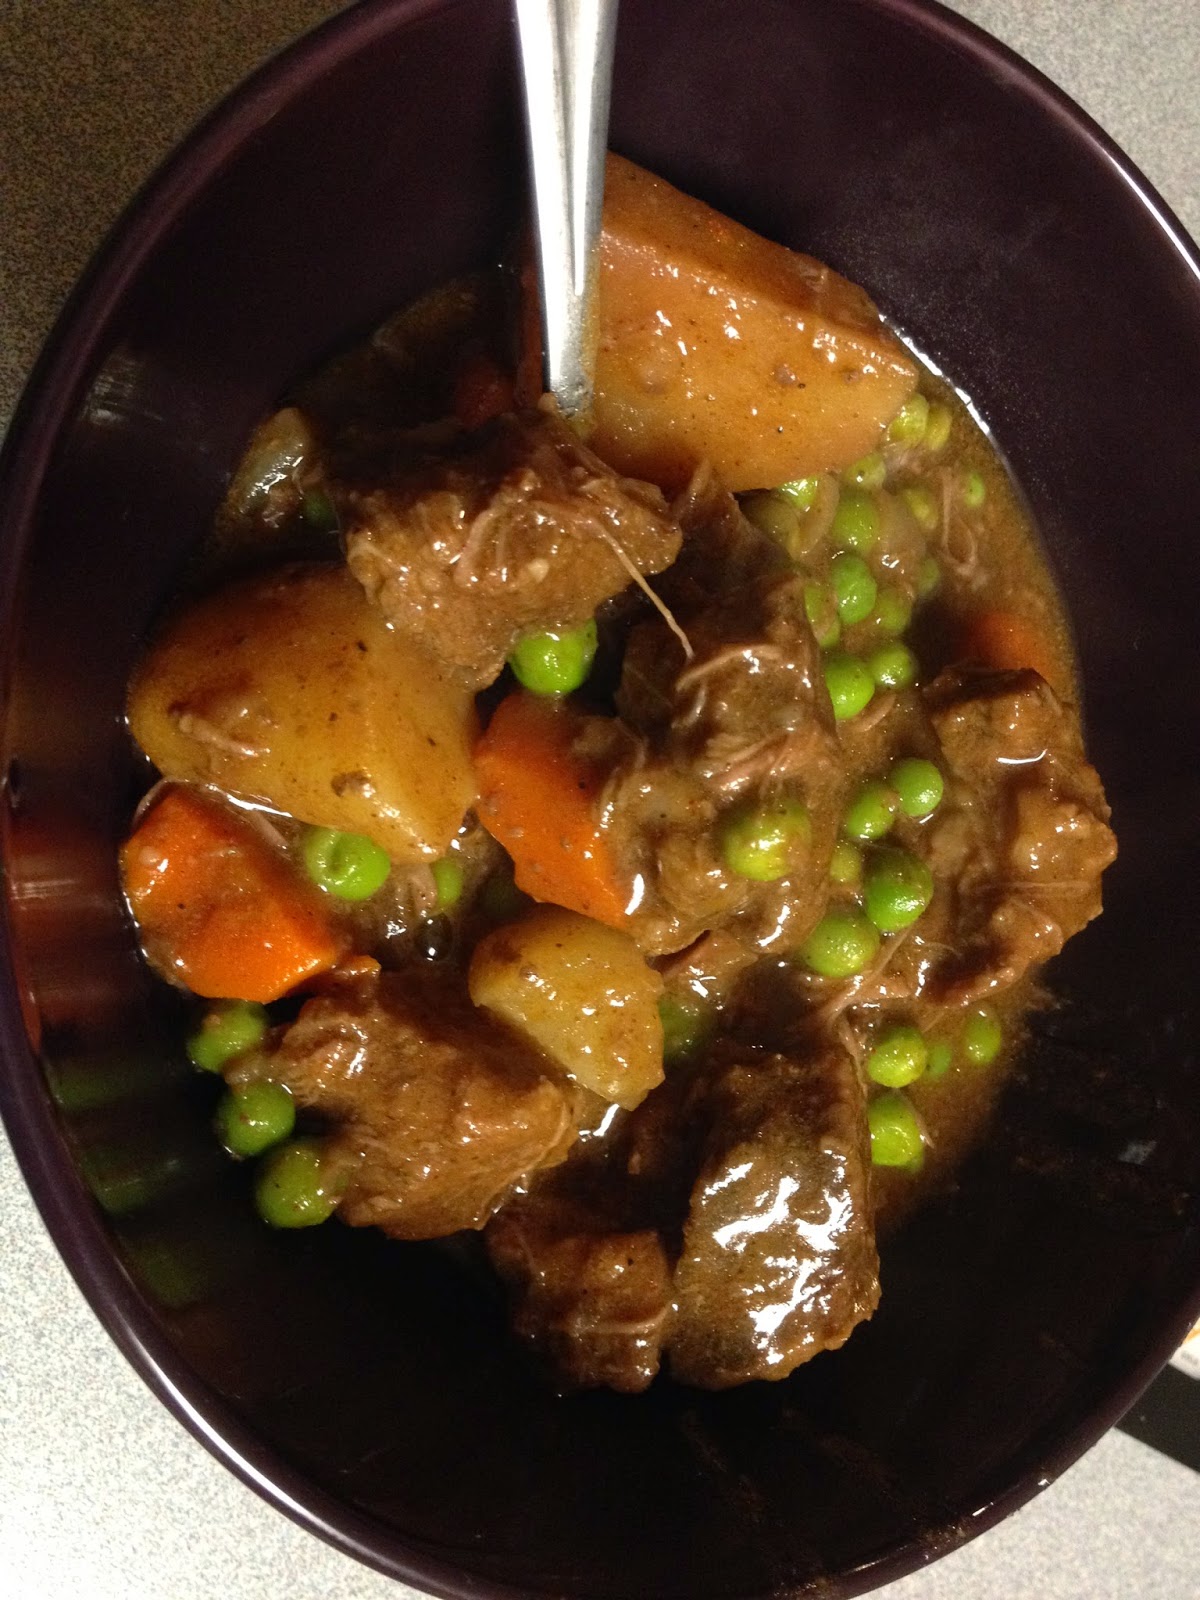
Here is a yummy (and easy) slow cooker beef stew recipe! I found the recipe off All Recipes. I selected it based off the over 2000 reviews. Because this was a meal that included kids (and they will refuse to eat a meal based on seeing certain ingredients) I blitzed the onions and celery in the food processor so that there were no visuals. Keep the potatoes and the carrots in the larger chunk sizes so that way they aren't mush after cooking for so long.

I prepped and assembled the meal the night before and kept it in the fridge. I woke up on Saturday morning, plugged in the slow cooker, then we ran our errands and attended our sporting events. We came back to a delish and warm stew!

I also made a loaf this dutch oven bread.

My dad's tomato based beef stew recipe can be found here!

Slow Cooker Beef Stew
Serves 6-8

3 - 4 pounds beef stew meat, cut into 1 inch cubes
3/4 cup all-purpose flour
1/2 tsp salt
1/2 tsp ground black pepper
1 1/2 tsp oregano
1 heaping tsp paprika
1 heaping tsp garlic powder
2 bay leaf
2 tsp Worcestershire sauce
1 tsp of gravy master
1 onion, chopped
2 stalks celery, sliced
4 potatoes, large dice
4 carrots, sliced thick
2 cups beef broth
12 oz frozen peas

Put all the ingredients (minus broth and peas) in the slow cooker and stir together so everything is coated. Then add the beef broth and give another stir. Everything will be a soupy mess.
Cover and cook on low for 10-12 hours or on high for 4-6 hours.
About 20 minutes before serving add the bag of frozen peas.

Saturday, September 6, 2014

Chicken Rice Soup

While it is almost 90F… fall is coming! I swear it! So here is a quick and easy chicken soup recipe that you can quickly assemble for those cool evenings. The roux will create a creamer thicker broth for the soup.

If you are cooking for picky kids puree the onion, garlic, and celery in the food processor. You’ll get the flavor but none of the texture. Rice can be substituted for pasta. Left over chicken would work too. And any veggies that may be having a slow death in your crisper drawer could be included in this as well! Flavors that would be tasty would include a few slices of ginger in the broth while cooking (remove before serving) or lemon juice in the broth.

This soup freezes well, just omit the rice/pasta. When you are ready to eat make the pasta/rice when the soup is heating up and then combine. This prevents the rice/pasta from being gummy and mushy.

Chicken Rice Soup
Makes 4-6 servings

2 tbsp oil
Small Onion, diced
3 garlic cloves, minced
3 carrots, sliced
3 stalks of celery, sliced
4 tbsp flour
2 tbsp butter
1 tbsp seasoning (oregano, Italian seasoning, or parsley)
1 can of corn (optional)
4-5 cans of chicken broth (it seems like a lot of broth but it will absorb and thicken as then soup sits in the fridge)
3 chicken breasts (cooked)
1 cup brown rice (uncooked)
Salt and pepper

To Cook Chicken:
Preheat oven to 350F. Season chicken with salt and pepper. Cook for about 30 minutes. When it is done take it out and let it cool. Shred and put aside.

To Cook Rice:
1 cup rice in 1 ½ cups of liquid (I do a split between water and chicken both). Bring to a boil then reduce to a simmer. When liquid is mostly absorbed (after approx. 25 minutes) turn off the heat and put aside.

To Make Soup:
While the chicken and rice are cooking, start making the soup! Heat large pot. Add a little oil and add in the garlic, onion, carrots, and celery. Season with salt and pepper. Let it sauté 5 minutes. Add butter and stir into the veggies. When melted add in the flour. Stir to coat the veggies. Add in seasoning of your choice. Season with salt and pepper. Add ½ can of broth and stir so the broth doesn’t become lumpy. When broth is smooth add in rest of the broth. Add chicken and rice when they are done cooking.

Friday, September 5, 2014

Roasted Lemon Broccoli


Here is a recipe for a fast and easy dinner veggie! The broccoli shrinks a lot when it gets roasted so we can eat 3-4 broccoli crowns for 2 people.

Update 12/20 - Finally had some left over and remembered to take a picture. This is also tasty with a little Parmesan cheese sprinkled over the top!

Roasted Lemon Broccoli
serves 2-4

2+ Crowns of Broccoli
1 Lemon
2-3 tsp Olive Oil
1-2 tsp Garlic powder

Preheat oven to 400F or 450F. Line cookie sheet with foil or use a silpat mat.

Wash and cut broccoli. Squeeze the lemon for the juice, drizzle olive oil, and spring garlic powder, over the broccoli. Toss to combine. Spread over the broccoli across the cookie sheet

Roast for 10-15 minutes. Take out when tender and crisped to your preference.

Wednesday, September 3, 2014

Mr. Tom's Grilled Chicken

Mr. Tom (aka my dad) made this grilled chicken when we were on vacation in Hilton Head. Everyone loved it so much I've made it almost every week since then! It is moist, light, and flavorful. Best part? It is 2 ingredients.

This chicken has also been used as the base for taco meat (shred and add taco seasoning), sandwiches (grilled chicken and cheese panini!), and salads.


Mr. Tom's Grilled Chicken
One pound of meat = 2-4 servings

Chicken breast and Chicken thighs
Italian Vinaigrette Salad Dressing

Clean up the chicken (pick off any fatty pieces you don't want). Then pour the salad dressing over the chicken. It doesn't have to soak/be submerged, but the chicken should be coated. Let it marinade for 4-5 hours.

When it is dinner time...turn the grill up to medium high. It is about 5-6 minutes per side for the breast (they are super thick and I forget I wanted to thin them until after they are on the grill). And it is 3-4 minutes per side for the thighs.