Saturday, June 23, 2012

Woodstock, Mt. Washington, and Franconia State Park

Nate and I went on a mini vacation! We went camping in the North Conway New Hampshire area and saw some of the sights! This was a cool vacation in which we had no time constraints and were able to stop off at any places that looked exciting! 
 
 
Woodstock, NH
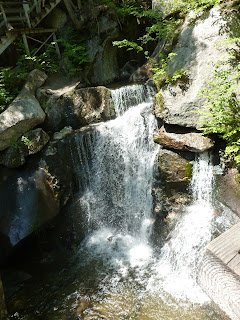
Lost River Gorge and Boulder Caves - Really cool!!! This is a boardwalk hike with caves along the way. You can cut through the path using the caves to get to the next portion of boardwalk, or you can skip the cave and walk ahead. The caves are very fun! It is well taken care of and there are also informational plaques(?) along the trail. One of the caves was tight, and wear clothes that you don't mind getting a little dirty. You are brushing up on the sides of some of the caves or sliding along on your belly. It is next to a river and waterfalls so it is a little damp (aka caves!!). 
 

Dilly Cliff Trail - Access it in the Lost River parking lot. It is a 1/2 mile hike and climbs 700 feet. That means it is a fairly steep hike. It is over rocks so wear the right shoes. I work Tevas and was fine. But sneakers would have been safer. We took about an hour.
 

Mt. Washington
 Pinkham Notch- This is the base for many Mt. Washington hikes (Tuckerman's Ravine). We stopped in and walked up to the Crystal Cascades to check out the waterfalls! This is a 10 minute, .3 mile walk up the trail, small incline over rocks. 

Mt. Washington Auto Road - There are many options to get to the summit of Mt Washington: train, hike, drive, or guided tours. We chose to drive up ourselves. Wow! Scary drive up! The road is a very narrow and you are on the edge of the cliff. It is two lane traffic so you have to pull off to the side at times. The entrance fee includes an audio CD that details the creation of the auto road and some of Mt Washington's history/geography. Bring a jacket, it is cold and windy up top! This is a very intense mountain and the weather can change at any moment so prepare well. If you don't like narrow roads this might not be the drive for you.

Franconia Notch State Park


Flume Gorge - We did the 2 mile loop. It starts with a dirt path, through a covered bridge, and then follows a boardwalk style hike (stairs too) and then goes back to dirt path. There are areas that are dirt paths as you go along. It was very pretty area with lots of waterfalls and mossy rocks. Bring bug spray. The top link is to the State Park website that doesn't have lots of information, if you want more start with some of the reviews on Yelp or Trip Advisor.

The Basin- This was one of the unplanned stops along the way. We parked in the lot off the highway and it was a 20 minute short walk along some very pretty rocky waterfalls and river.

Food
Woodstock Inn Station and Brewery - Lots of filling food options. We had the slider sampler, nachos, and pulled pork sandwiches (we went twice... !). Great pulled pork! Reasonably priced and fast service. Ability to eat inside or outside. I didn't have any of the beers, but Nate did and said it was tasty.

Friday, June 22, 2012

Godmother's Mac & Cheese Casserole (Plus Chicken & Broccoli)

N and I were looking to make something for dinner and we decided to make a mac & cheese casserole. Now, who makes the best mac & cheese casserole? My godmother. It is cheesy, creamy, and topped with buttery Ritz crackers.

The recipe actually comes from the back of the Prince elbows pasta box, however there is a secret ingredient! A tsp of ground mustard. Where did this addition come from? I have no idea. But this is a very easy dish that is great to bring to big family parties.

I doubled some of the recipe (typical me, I only had enough to double some of the ingredients). You can also find it on this blog as well.

I wanted to make this more filling so I added 2 chicken breast and a crown of broccoli.

I started with the cheese sauce. I combined 2 tbsp of melted butter with 1/4 c of flour, 1 tsp of onion powder, 1 tsp ground mustard, and salt & pepper. I let this all combine. Now I get creative. I added the (mostly defrosted) chicken and let that cook a little bit. Then I tossed in the chopped up broccoli. I didn't have enough milk, I used 2 cups of 1% milk. I also used 2 cups of shredded cheddar cheese. The recipe called for double that. However I didn't let that phase me and continued to stir until the cheese melted into a thick sauce. It looks like broccoli and cheddar soup!
 
I cooked the pasta according to the directions on the box. Elbow pasta was not on sale so I purchased rigatoni for $0.88 instead of elbows for $1.29.

I drained the pasta and put it back in the pot. I poured the cheese sauce over the pasta and stirred. I dumped the entire pot into my casserole dish and covered with another cup of mozzarella cheese.

Next is the cracker topping. I used my food processor to crush 15 Ritz crackers and combine it with a tbsp of melted butter.
 Baked it for 25 minutes at 350F.
Next time I would use the correct amount of cheese which is 4 cups. But everything cooked perfectly and made about 4-6 servings!

Godmother's Mac & Cheese
4-6 servings

1 box of pasta (16 oz)
2 tbsp butter
1/2 cup of flour
1 tsp onion powder
1 tsp ground mustard
salt & pepper
1 crown of broccoli
1 lb of chicken - 2 chicken breast, diced
4 cups of cheese
3 cups of milk

15 Ritz crackers, crushed
1 tbsp butter, melter

  1. Preheat oven to 350 degrees F.
  2. Cook pasta according to directions. Drain.
  3. Meanwhile, in a pot, melt butter, add flour, onion powder, ground mustard, salt, and pepper. Add chicken and broccoli (if using). Let good for a few minutes. Add milk and cheese. Stir until melted. 
  4. Combine pasta and sauce. Pour into 9x13 baking dish.
  5. Combine crushed crackers and butter. Sprinkle over the pasta mixture.
  6. Bake for 20-30 minutes until golden and bubble. 
Enjoy!

Wednesday, June 20, 2012

Garlic Butter Sauce

I went to dinner with my cousin the other night and had an incredible pasta, chicken, and broccoli dish that was covered in this mushroom garlic butter sauce. Wowww. I also tragically forgot my leftovers on the table. Typical. I had even portioned out enough for lunch!!

So what else to do but try and recreate this!

I Googled several garlic butter sauce recipes and once I had a basic concept I just went along with it. Here is my creation! This meal took about 15 minutes to prepare.

Cook noodles according to package instructions. I chose egg noodles because that was what I had. Any pasta works.

Melt butter in a pan.
Add oregano, red pepper flakes, salt, pepper, garlic, and onion. I eyeballed this and shake it into the cap and into the pan.

Stir it about for a minute.

Add diced chicken (smaller pieces = faster cooking) and peas. Per usual my chicken was only semi thawed. Soft enough to cut up but definitely not thawed out. Took about 7 minutes to cook the chicken all the way through.

Add cooked noodles into the pan and toss to coat.

If you wanted more "sauce" add some pasta water and cornstarch about 1/8 of a tsp at a time.

This is enough for 2 folks. Maybe serve with salad or bread too. This is an easy enough sauce to bulk up too. Add some veggies, add more chicken, add shrimp. I would have added some sliced zucchini or broccoli if I had some hanging out in the fridge. You can always add more butter as you go if you find you are running out of "sauce" but you can't take out the extra butter.

Another thought would be to use olive oil with a little butter mixed in.. or make it cream based and add some milk and flour to thicken it... I'll keep you posted! :)
Garlic Butter Sauce
Makes approx 2 servings

1/4 of a stick of butter
1 tsp oregano
1/2 tsp red pepper flakes
salt & pepper
2 garlic cloves, minced
1/4 cup chopped onion
1 chicken breast, diced
1/2 cup frozen peas
2 cups dry egg noodles
  1. Cook noodles according to package instructions.
  2. Melt butter in a pan.
  3. Add oregano, red pepper flakes, salt, pepper, garlic, and onion. Stir it about for a minute.
  4. Add diced chicken (smaller pieces = faster cooking) and peas.
  5. Add cooked noodles and toss to coat.
Enjoy!!

Friday, June 1, 2012

Candied Pecans

N. bought me a silpat mat!! What is a silpat mat, you ask? Basically its a reusable nonstick baking mat that can be used instead of parchment paper. Isn't he the best? I had to try it out and make him something. Since it was late and I was tired, I wanted to go with an easy recipe that didn't require needing to chill dough (shortbread was the other choice).

Seriously, this recipe is pretty much fool proof. It will be tasty no matter what. I wanted to half the recipe, but only successfully halved some of the ingredients... still came out good though!

I made this for the holidays last year, your house will smell amazing! If you wanted to half this recipe, it is easy. If you wanted to double the recipe, it is easy.

The original recipe calls for pecans, which are so good! However, I didn't have enough, so I used 1 cup of walnuts and 1 cup of pecans.

Whip an egg white and tbs of water until its frothy. Didn't half it, just used the whole thing.
Add nuts and coat in the egg white.
Add cinnamon (not halved), sugar (halved), and salt (halved).
Stir it all up. Because I didn't use all the nuts my mixture had some liquid in bottom of the bowl.

Put on a grease/parchment paper/silpat covered cookie sheet and bake at 250 for an hour. Stir them on the cookie sheet every 15 minutes.
(Note the pretty new mat!)
I'm impatient and I was tired, I took them out after 45 minutes.

I let them cool for a little bit and then put them into containers to store at room temperature.

These are tasty as a snack but also would be good on a salad!

Candied Pecans
Makes 1 lb

1 egg white
1 tbs water
1 lb pecans
1 cup white sugar
3/4 tsp salt
1/2 tsp cinnamon
  1. Preheat oven to 250F. Prepare 1 baking sheet.
  2. Whip 1 egg white and water until frothy. In separate bowl combine sugar, salt, and cinnamon.
  3. Add nuts to egg white. Add dry ingredients. Stir until well coated.
  4. Spread out on baking sheet
  5. Bake for 1 hour, stirring every 15 minutes.